Top 5 Painting Techniques to Achieve an Ultra-Realistic Finish

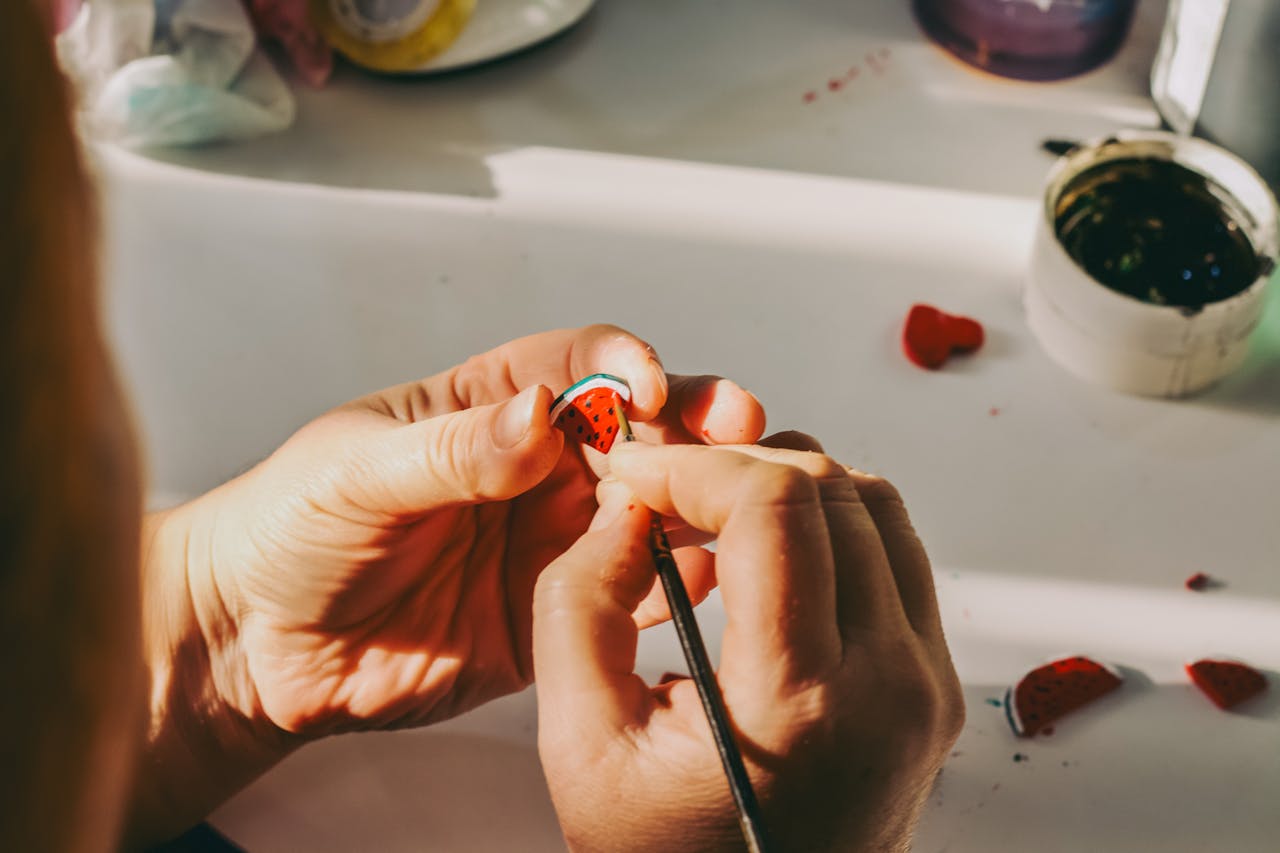
Painting miniatures is an art form, and achieving that ultra-realistic look is what sets a great model apart from a good one. So, whether you’re just getting started or you’re a seasoned pro, let’s dive into the top techniques that’ll take your painting game to the next level. Trust me, with a little practice, you’ll be amazed at the results !

One thing I’ve learned over the years is that it’s not just about layering on paint-it’s about controlling light, shadows, and texture. If you’ve ever been to a miniature painting competition or browsed some of the amazing work out there, you’ve probably seen models that look so real you can almost feel them. Well, achieving that level of detail isn’t as difficult as it seems, once you get the hang of the right techniques. You might even want to check out some of the inspiration over at cuisine-meuble-decoration.fr, where they dive into everything from DIY projects to highly detailed models.

1. Wet Blending : The Secret to Smooth Transitions

Ever seen those models with perfectly blended highlights and shadows that seem to melt into each other ? That’s what wet blending is all about. This technique involves blending two or more wet paints together on the model itself. It’s tricky at first, but once you nail it, you’ll be able to create transitions so smooth, they almost look airbrushed.

Here’s a pro tip : keep your paint thinned with water, and work in small sections. Try not to rush-patience is key. And don’t forget to clean your brush frequently to avoid muddy colors. Honestly, when I first tried wet blending, I was shocked at how real it looked. It’s like magic !

2. Layering : Building Depth with Thin Layers

Layering is one of the most fundamental techniques, but don’t let its simplicity fool you-it’s incredibly powerful. The idea here is to apply thin, controlled layers of paint, gradually building up from dark to light. Each layer should be a little lighter and more opaque than the one underneath, creating depth and volume.

The trick is to make sure your layers are thin enough that you can still see some of the previous ones underneath. This is especially effective for skin tones, fabric textures, and even armor. I’ll be honest, I used to get frustrated with this, thinking it would never look right. But once I understood that it’s all about building layers, piece by piece, I got the hang of it.

3. Dry Brushing : Bringing Out the Details

Dry brushing is an old-school technique that still gets results every time. It’s perfect for bringing out surface details like texture, armor, or wrinkles in clothing. You just take a small amount of paint on a nearly dry brush and gently sweep it over the raised areas of your model. This highlights the details without covering the deeper recesses, which will stay darker.

It’s also a great technique to use on terrain pieces, like rocks and trees, to add that extra layer of realism. I love the texture it adds-it’s like bringing the model to life. The first time I dry brushed a stone texture, I couldn’t stop staring at it. The way the highlights caught the light-wow !

4. Glazing : Subtle Shifts in Color

If you want to add richness to your models without losing that smooth transition between colors, glazing is the way to go. It’s a technique where you apply thin, transparent layers of paint over your base coat to shift the color and create depth.

Glazes can be used to warm up or cool down a model’s tones. Want to give a face a natural flush ? Add a red glaze over the cheeks. Need to deepen the shadows on a cloak ? A blue glaze works wonders. It’s a simple technique, but the effect is super powerful. Honestly, it’s one of those little tricks that elevates your painting instantly. The change in color isn’t dramatic, but it’s definitely noticeable.

5. Washes : Shading Made Easy

Washes are a godsend for adding depth and shadows to your models, and they’re one of the easiest techniques to master. A wash is basically a very thin layer of paint that flows into the recesses of your model, instantly darkening them. It’s perfect for armor, folds in clothing, or the nooks and crannies on a miniature.

For me, the best part about washes is that they’re forgiving. If you apply too much, you can always remove excess with a clean brush or sponge. And the way they bring out the details is almost magical. I remember washing a knight’s armor for the first time, and seeing all the tiny grooves pop out-it’s like the model suddenly had more life.

Conclusion : Practice Makes Perfect

At the end of the day, the key to ultra-realistic painting is practice. Don’t be afraid to experiment with these techniques, and trust me-each time you paint, you’ll notice improvement. The more you push yourself, the better your results will be. It’s all about taking your time, experimenting, and most importantly, having fun with the process.

So, what do you think ? Ready to give these techniques a try on your next project ? Which one are you most excited to experiment with ? I’d love to hear your thoughts and see what you create !

How to Get Started in Model Making: Key Steps to Avoid Mistakes

So, you’ve decided to dive into the world of model making ? That’s awesome ! It’s a hobby that can be incredibly rewarding, whether you’re building miniature cars, planes, or even entire landscapes. But, just like any creative process, it can be a bit overwhelming at first. Where do you even start ? What do you need ? And most importantly, how do you avoid the rookie mistakes that can ruin your first few projects ?

Don’t worry, I’ve got your back ! Let’s walk through some simple steps to help you get started on the right foot. Trust me, I’ve been there, and I can tell you, the journey is more fun when you know what you’re doing. By the way, if you’re still in the planning phase, check out this great site for some cool tips on tools and materials to kick off your projects.

1. Choose the Right Model Kit

Okay, first things first : pick the right kit. Sounds easy, right ? But with so many options out there-military models, cars, fantasy figures-how do you know which one is best for a beginner ? Personally, I always recommend starting with something simple, like a small car or plane. Don’t jump straight into a complex build like a fully detailed train set unless you’re up for a serious challenge.

Look for beginner-friendly kits that offer step-by-step instructions. You’ll feel much more confident if the kit is designed for someone who’s new to the craft. And while we’re talking about it, be careful with those ultra-cheap kits. I’ve tried a few in the past, and let me tell you, the quality often reflects the price. It’s worth spending a little extra to get something that’s actually fun to work with.

2. Gather Your Tools and Materials

Once you’ve got your kit, it’s time to gather your tools. And here’s the thing : you don’t need to go all out with a fancy toolset right off the bat. Sure, I’ve got a bunch of high-end tools in my workshop now, but when I started, a basic hobby knife, a pair of tweezers, some glue, and a few brushes were all I really needed.

For paint, I’d recommend starting with acrylics. They’re easy to work with, they dry quickly, and they come in a wide range of colors. Plus, they’re easy to clean off your tools (and hands, trust me on that one). If you want a bit more precision, you can also look into specialized model paints.

3. Set Up Your Workspace

Now, don’t underestimate the importance of a good workspace. When I first started, I was building models on my kitchen table, and let me tell you, it was a mess. Not only was I constantly worried about spilling paint, but I also had nowhere to store my tools. I ended up getting frustrated and abandoning projects because of it.

Ideally, you’ll want a clean, well-lit, and quiet space for your builds. A sturdy table, good lighting (a desk lamp with a magnifying lens is a lifesaver), and some basic storage for your tools are key. I even set up a little corkboard to keep track of my ongoing projects. It’s amazing how much more enjoyable your builds are when you’re organized and comfortable.

4. Start with Simple Techniques

Don’t rush into advanced techniques, like airbrushing or weathering, right away. Trust me, I made that mistake early on, and it was a disaster. I ended up ruining a model with uneven paint and too many layers of detail. Start with the basics : assembling the parts, applying a smooth coat of paint, and learning how to make neat, clean edges.

As you get more comfortable, you can slowly add complexity-like detailing or experimenting with different textures. But don’t worry about getting everything perfect right away. Honestly, a lot of it is about trial and error. You’ll learn a lot from your mistakes, and that’s okay !

5. Take Your Time

Model making isn’t a race. It’s all about enjoying the process. Sure, it can be tempting to rush through your first model just to see the finished product, but trust me, the real magic happens when you take your time and pay attention to the small details. And if something goes wrong ? Just take a deep breath and start over. Sometimes, I’ve had to reassemble parts multiple times before I was happy with them.

Remember, model making is about relaxing, getting into a flow, and expressing your creativity. So don’t stress if things don’t turn out perfect at first. I promise, every mistake is part of the learning process.

6. Ask for Feedback and Join the Community

Finally, don’t be afraid to ask for feedback. The model making community is one of the friendliest and most welcoming groups I’ve ever been a part of. Whether it’s online forums, social media, or local clubs, people are always willing to help out beginners. Plus, you might even get some new ideas for your next project !

Have you checked out any online tutorials or workshops yet ? There are so many great resources out there that can help you improve your skills. Some of them even offer in-depth, step-by-step guides that go beyond the basic instructions in your kit.

And just a quick note, always remember to have fun with it ! Whether you’re building your first model or you’re deep into a long-term project, model making is all about enjoying the process and letting your creativity flow.

Conclusion

So, to sum it up : start simple, gather the right tools, set up a dedicated workspace, take your time, and don’t be afraid to reach out to others for advice. Once you get the hang of it, model making can be an incredibly rewarding hobby. Plus, you’ll always have something awesome to show for your effort at the end !

Now, it’s your turn-what model are you thinking of tackling first ?

10 Miniature Painting Mistakes Even Advanced Hobbyists Still Make (and How to Avoid Them)

Let’s be honest : no matter how many armies we’ve painted, how many brushes we’ve ruined, or how many late-night “just one more highlight” sessions we’ve survived, we all still make the same dumb mistakes sometimes. I’ve been painting since my first Warhammer blister pack back in 2003 (yep, the one with the awful shiny metal), and I still catch myself slipping into bad habits. And funny enough, when I talk with other hobbyists at events in Cambridge or during store nights, it’s always the same 10 traps popping up. Read More

The 10 miniature painting mistakes even seasoned hobbyists still make (and how to finally ditch them)

Let’s be honest : no matter how long we’ve been painting miniatures-five months or fifteen years-we all fall into the same traps. I still catch myself doing things I swore I’d stopped back in my tiny student bedroom in Cambridge, hunched over a wobbly IKEA desk with a lamp that buzzed like a bee. If you’ve ever stared at a model thinking “why does this still look… off ?”, you’re definitely not alone. Read More

Which Airbrush Should You Choose in 2025? A Clear, No-Nonsense Guide for Miniature Painters

If you’re standing in front of your desk (or scrolling on your phone at 1am… we’ve all been there) wondering “Which airbrush should I buy in 2025?”, you’re not alone.
Between the dozens of models, the confusing specs and the prices that jump from £40 to £300 in a blink, choosing an airbrush can feel… messy.

So let’s cut through the noise.
No fluff. No intimidating jargon.
Just a practical guide built for real miniature painters – beginners who want a smooth start, and experienced hobbyists who want to upgrade without regret.

Ready ? Let’s breathe a bit of clean air into this whole topic. Read More